在网上看了很多教程,在安装的过程中结合起了不下100个搜索结果,花费了一天一夜的时间终于用Postfix和Dovecot搭建起了邮件服务器,并且能够正常收发邮件,不被拦截了。
这篇文章包含以下内容:
- 安装Postfix
- 安装Dovecot
- 配置以上两个软件
- 配置SPF
- 配置DKIM
- 配置DMARC
- 配置TLS
安装Postfix
很简单的一个流程,直接运行:
apt-get install postfix安装Dovecot
也是很简单的一个流程,直接运行:
apt-get install dovecot配置软件
这个环节是最死亡的,一天一夜时间基本都在配置这个软件。因为网上的教程参差不齐,每个人的版本都不一样,配置的过程中少说我查了不下500次log,最终才研究明白。
第一个软件:Postfix,Postfix提供SMTP发件服务,所以在某些程度上来讲,是比较重要的且比较不好配置的一个软件。
首先说明,我个人配置的软件,并未考虑到权限的因素在内,所以与很多教程都不一样,如果您不是个人使用,建议在网上查询相应教程。
我们先来编辑这个文件:
/etc/postfix/main.cf
nano /etc/postfix/main.cf为了避免麻烦,我直接将整个文件复制上来
# See /usr/share/postfix/main.cf.dist for a commented, more complete version
# Debian specific: Specifying a file name will cause the first
# line of that file to be used as the name. The Debian default
# is /etc/mailname.
#myorigin = /etc/mailname
#default_privs = www-data
smtpd_banner = $myhostname ESMTP $mail_name (Ubuntu)
biff = no
# appending .domain is the MUA's job.
append_dot_mydomain = no
# Uncomment the next line to generate "delayed mail" warnings
#delay_warning_time = 4h
readme_directory = no
# See http://www.postfix.org/COMPATIBILITY_README.html -- default to 2 on
# fresh installs.
compatibility_level = 2
# TLS parameters
#SSL证书的配置
smtpd_tls_cert_file= /123/123/pem
smtpd_tls_key_file=/123/123.key
smtpd_use_tls=yes
smtpd_tls_session_cache_database = btree:${data_directory}/smtpd_scache
smtp_tls_session_cache_database = btree:${data_directory}/smtp_scache
smtpd_tls_security_level = may
smtp_tls_security_level = may
#smtpd_tls_auth_only = yes
# Virtual Mailbox Domain Settings
virtual_alias_maps = mysql:/etc/postfix/mysql_virtual_alias_maps.cf
virtual_mailbox_domains = mysql:/etc/postfix/mysql_virtual_domains_maps.cf
virtual_mailbox_maps = mysql:/etc/postfix/mysql_virtual_mailbox_maps.cf
virtual_mailbox_limit = 51200000
#解释一下,我选择了uid为8的mail用户作为了操作用户,方便进行操作,不需要更改太多权限
virtual_minimum_uid = 8
virtual_uid_maps = static:8
virtual_gid_maps = static:8
virtual_mailbox_base = /var/mail
virtual_transport = virtual
#SASL AS Dovecot to authenticate.
smtpd_sasl_type = dovecot
smtpd_sasl_path = private/auth
smtpd_sasl_auth_enable = yes
broken_sasl_auth_clients = yes
smtpd_sasl_security_options = noanonymous
smtpd_sasl_local_domain =
smtpd_sasl_authenticated_header = yes
smtpd_recipient_restrictions =permit_sasl_authenticated, permit_mynetworks, reject_unauth_destination, permit
# See /usr/share/doc/postfix/TLS_README.gz in the postfix-doc package for
# information on enabling SSL in the smtp client.
smtpd_relay_restrictions = permit_mynetworks permit_sasl_authenticated defer_unauth_destination
#这里填写你的域名
myhostname = 123.com
alias_maps = hash:/etc/aliases
alias_database = hash:/etc/aliases
myorigin = /etc/mailname
#mydestination = $myhostname, #(这里别忘了改)123.com, localhost
mydestination =
relayhost =
#mynetworks = 127.0.0.0/8 [::ffff:127.0.0.0]/104 [::1]/128
mynetworks = 127.0.0.0/8
#mynetworks = all
mailbox_size_limit = 0
recipient_delimiter = +
inet_interfaces = all
inet_protocols = all
#这里是DKIM的配置,如果不需要可以全部注释掉
smtpd_milters= inet:127.0.0.1:8891
non_smtpd_milters = $smtpd_milters
milter_default_action = accept
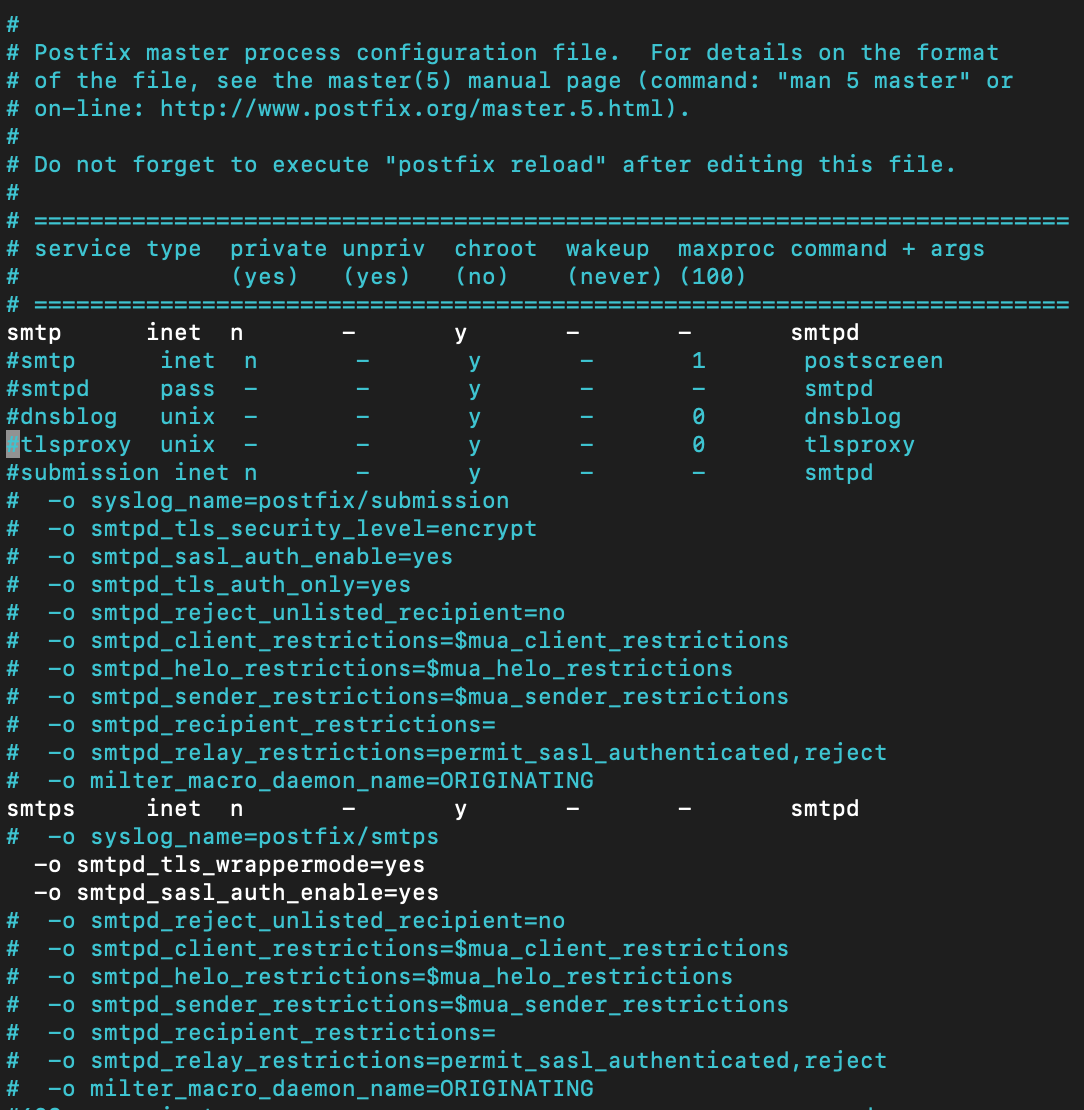
milter_protocol = 2然后就是另一个文件
nano /etc/postfix/master.cf这里的配置我发成一个图片吧
然后我们需要在/etc/postfix目录下创建三个新文件:
第一个:mysql_virtual_alias_maps.cf
user = MYSQL用户名
password = MYSQL密码
hosts = MYSQL地址
dbname = Postfix的数据库名
table = alias
select_field = goto
where_field = address第二个:mysql_virtual_mailbox_maps.cf
user = MYSQL用户名
password = MYSQL密码
hosts = MYSQL地址
dbname = Postfix的数据库名
table = mailbox
select_field = maildir
where_field = username第三个:mysql_virtual_domains_maps.cf
user = MYSQL用户名
password = MYSQL密码
hosts = MYSQL地址
dbname = Postfix的数据库名
table = domain
select_field = domain
where_field = domain
最后我们重启一下Postfix
service postfix restart然后我们安装Postfix-admin
apt-get install postfix-admin安装好了我们可以把他软链接到网站目录下
ln -s /usr/share/postfixadmin /你的网站目录然后访问就可以开始在网站上配置了。
第二个软件:就是Dovecot,同样也不简单
首先在/etc/dovecot/dovecot.conf中加入一行
protocols = imap pop3 lmtp然后配置/etc/dovecot/dovecot-sql.conf.ext
# This file is commonly accessed via passdb {} or userdb {} section in
# conf.d/auth-sql.conf.ext

# This file is opened as root, so it should be owned by root and mode 0600.
#
# http://wiki2.dovecot.org/AuthDatabase/SQL
#
# For the sql passdb module, you'll need a database with a table that
# contains fields for at least the username and password. If you want to
# use the user@domain syntax, you might want to have a separate domain
# field as well.
#
# If your users all have the same uig/gid, and have predictable home
# directories, you can use the static userdb module to generate the home
# dir based on the username and domain. In this case, you won't need fields
# for home, uid, or gid in the database.
#
# If you prefer to use the sql userdb module, you'll want to add fields
# for home, uid, and gid. Here is an example table:
#
# CREATE TABLE users (
#     username VARCHAR(128) NOT NULL,
#     domain VARCHAR(128) NOT NULL,
#     password VARCHAR(64) NOT NULL,
#     home VARCHAR(255) NOT NULL,
#     uid INTEGER NOT NULL,
#     gid INTEGER NOT NULL,
#     active CHAR(1) DEFAULT 'Y' NOT NULL
# );

# Database driver: mysql, pgsql, sqlite
# 这里选择你的数据库类型
driver = mysql

# Database connection string. This is driver-specific setting.
#
# HA / round-robin load-balancing is supported by giving multiple host
# settings, like: host=sql1.host.org host=sql2.host.org
#
# pgsql:
#   For available options, see the PostgreSQL documention for the
#   PQconnectdb function of libpq.
#   Use maxconns=n (default 5) to change how many connections Dovecot can
#   create to pgsql.
#
# mysql:
#   Basic options emulate PostgreSQL option names:
#     host, port, user, password, dbname
#
#   But also adds some new settings:
#     client_flags           - See MySQL manual
#     connect_timeout        - Connect timeout in seconds (default: 5)
#     read_timeout           - Read timeout in seconds (default: 30)
#     write_timeout          - Write timeout in seconds (default: 30)
#     ssl_ca, ssl_ca_path    - Set either one or both to enable SSL
#     ssl_cert, ssl_key      - For sending client-side certificates to server
#     ssl_cipher             - Set minimum allowed cipher security (default: HIGH)
#     ssl_verify_server_cert - Verify that the name in the server SSL certificate
#                              matches the host (default: no)
#     option_file            - Read options from the given file instead of
#                              the default my.cnf location
#     option_group           - Read options from the given group (default: client)
#
#   You can connect to UNIX sockets by using host: host=/var/run/mysql.sock
#   Note that currently you can't use spaces in parameters.
#
# sqlite:
#   The path to the database file.
#
# Examples:
#   connect = host=192.168.1.1 dbname=users
#   connect = host=sql.example.com dbname=virtual user=virtual password=blarg
#   connect = /etc/dovecot/authdb.sqlite
#
#这条是数据库连接配置信息
connect = host=数据库地址 dbname=数据库名 user=数据库用户名 password=数据库密码

# Default password scheme.
#
# List of supported schemes is in
# http://wiki2.dovecot.org/Authentication/PasswordSchemes
#
default_pass_scheme = MD5-CRYPT

# passdb query to retrieve the password. It can return fields:
#   password - The user's password. This field must be returned.
#   user - user@domain from the database. Needed with case-insensitive lookups.
#   username and domain - An alternative way to represent the "user" field.
#
# The "user" field is often necessary with case-insensitive lookups to avoid
# e.g. "name" and "nAme" logins creating two different mail directories. If
# your user and domain names are in separate fields, you can return "username"
# and "domain" fields instead of "user".
#
# The query can also return other fields which have a special meaning, see
# http://wiki2.dovecot.org/PasswordDatabase/ExtraFields
#
# Commonly used available substitutions (see http://wiki2.dovecot.org/Variables
# for full list):
#   %u = entire user@domain
#   %n = user part of user@domain
#   %d = domain part of user@domain
#
# Note that these can be used only as input to SQL query. If the query outputs
# any of these substitutions, they're not touched. Otherwise it would be
# difficult to have eg. usernames containing '%' characters.
#
# Example:
#   password_query = SELECT userid AS user, pw AS password \
#     FROM users WHERE userid = '%u' AND active = 'Y'
#
#password_query = \
#  SELECT username, domain, password \
#  FROM mailbox WHERE username = '%n' AND domain = '%d'

#这里是用来验证用户密码的,如果你和我的没区别就不需要改
password_query = \
   SELECT username as user, password \
   FROM mailbox WHERE username = '%u'

# userdb query to retrieve the user information. It can return fields:
#   uid - System UID (overrides mail_uid setting)
#   gid - System GID (overrides mail_gid setting)
#   home - Home directory
#   mail - Mail location (overrides mail_location setting)
#
# None of these are strictly required. If you use a single UID and GID, and
# home or mail directory fits to a template string, you could use userdb static
# instead. For a list of all fields that can be returned, see
# http://wiki2.dovecot.org/UserDatabase/ExtraFields
#
# Examples:
#   user_query = SELECT home, uid, gid FROM users WHERE userid = '%u'
#   user_query = SELECT dir AS home, user AS uid, group AS gid FROM users where userid = '%u'
#   user_query = SELECT home, 501 AS uid, 501 AS gid FROM users WHERE userid = '%u'
#
#这里是用来获取用户信息的,尽量不用改
user_query = \
  SELECT ('8') as 'uid',('8') as 'gid'

# If you wish to avoid two SQL lookups (passdb + userdb), you can use
# userdb prefetch instead of userdb sql in dovecot.conf. In that case you'll
# also have to return userdb fields in password_query prefixed with "userdb_"
# string. For example:
#password_query = \
#  SELECT userid AS user, password, \
#    home AS userdb_home, uid AS userdb_uid, gid AS userdb_gid \
#  FROM users WHERE userid = '%u'

# Query to get a list of all usernames.
#iterate_query = SELECT username AS user FROM users
然后更改/etc/dovecot/conf.d/10-auth.conf,只更改这里写到的:
#这里是加上一个
auth_mechanisms = plain login

#这里是删掉这两行前面的注释
!include auth-system.conf.ext
!include auth-sql.conf.ext
如果有ssl配置,更改10-ssl.conf
ssl = yes
ssl_cert = <证书地址
ssl_key = <证书地址
在这里需要注意!!!!你的证书一定要一个完整的证书链才能够使用TLS的加密方式!!!
10-mail.conf
mail_location = maildir:/var/mail/dovecot/%d/%n:INBOX=/var/mail/%d/%n10-master.conf的话就是整个复制上来了
#default_process_limit = 100
#default_client_limit = 1000

# Default VSZ (virtual memory size) limit for service processes. This is mainly
# intended to catch and kill processes that leak memory before they eat up
# everything.
#default_vsz_limit = 256M

# Login user is internally used by login processes. This is the most untrusted
# user in Dovecot system. It shouldn't have access to anything at all.
#default_login_user = dovenull

# Internal user is used by unprivileged processes. It should be separate from
# login user, so that login processes can't disturb other processes.
#default_internal_user = dovecot

service imap-login {
  inet_listener imap {
    #port = 143
  }
  inet_listener imaps {
    #port = 993
    #ssl = yes
  }

  # Number of connections to handle before starting a new process. Typically
  # the only useful values are 0 (unlimited) or 1. 1 is more secure, but 0
  # is faster. <doc/wiki/LoginProcess.txt>
  #service_count = 1

  # Number of processes to always keep waiting for more connections.
  #process_min_avail = 0

  # If you set service_count=0, you probably need to grow this.
  #vsz_limit = $default_vsz_limit
}

service pop3-login {
  inet_listener pop3 {
    #port = 110
  }
  inet_listener pop3s {
    #port = 995
    #ssl = yes
  }
}

service lmtp {
  unix_listener lmtp {
    #mode = 0666
  }

  # Create inet listener only if you can't use the above UNIX socket
  #inet_listener lmtp {
    # Avoid making LMTP visible for the entire internet
    #address =
    #port =
  #}
}

service imap {
  # Most of the memory goes to mmap()ing files. You may need to increase this
  # limit if you have huge mailboxes.
  #vsz_limit = $default_vsz_limit

  # Max. number of IMAP processes (connections)
  #process_limit = 1024
}

service pop3 {
  # Max. number of POP3 processes (connections)
  #process_limit = 1024
}

service auth {
  # auth_socket_path points to this userdb socket by default. It's typically
  # used by dovecot-lda, doveadm, possibly imap process, etc. Users that have
  # full permissions to this socket are able to get a list of all usernames and
  # get the results of everyone's userdb lookups.
  #
  # The default 0666 mode allows anyone to connect to the socket, but the
  # userdb lookups will succeed only if the userdb returns an "uid" field that
  # matches the caller process's UID. Also if caller's uid or gid matches the
  # socket's uid or gid the lookup succeeds. Anything else causes a failure.
  #
  # To give the caller full permissions to lookup all users, set the mode to
  # something else than 0666 and Dovecot lets the kernel enforce the
  # permissions (e.g. 0777 allows everyone full permissions).
  unix_listener auth-userdb {
    mode = 0666
    #user =
    #group =
  }

  # Postfix smtp-auth
  unix_listener /var/spool/postfix/private/auth {
    mode = 0666
    #user = root
  }

  # Auth process is run as this user.
  #user = $default_internal_user
}

service auth-worker {
  # Auth worker process is run as root by default, so that it can access
  # /etc/shadow. If this isn't necessary, the user should be changed to
  # $default_internal_user.
  user = root
}

service dict {
  # If dict proxy is used, mail processes should have access to its socket.
  # For example: mode=0660, group=vmail and global mail_access_groups=vmail
  unix_listener dict {
    #mode = 0600
    #user =
    #group =
  }
}
然后我们就重启这两个软件就好了。
我们这个时候在postfix-admin网站上创建个账户,然后用手机或者电脑的邮件客户端测试一下是否可以正常使用。
log文件在/var/log/mail.log,建议有问题立刻查看,非常有用。
配置SPF
在域名解析记录中添加以下内容:
- 解析类型:TXT
- 主机记录:@
- 记录值:v=spf1 a ip4:服务器的ip地址 ~all
这个记录值有很多种配置方法,如果有ipv6地址的话,就需要改成
v=spf1 a ip4:ipv4地址 ip6:ipv6地址 ~all有特殊需求的话可以在网上找到SPF记录配置方法,这里就不做赘述了。
配置DKIM(转载)
转载自:https://www.cnblogs.com/jifeng/p/6501376.html
1、Ip反向解析,找isp添加一条IP到mail.domain.com记录
2.为postfix添加dkim认证:(http://blog.eqoe.cn/posts/build-perfect-mail-server.html) http://www.mail-tester.com/
apt-get install opendkim
安装完毕后,修改opendkim配置文件
vim /etc/opendkim.conf,将以下内容复制到文件末尾,保存
AutoRestart             Yes
AutoRestartRate         10/1h
LogWhy                  Yes
Syslog                  Yes
SyslogSuccess           Yes
Mode                    sv
Canonicalization        relaxed/simple
ExternalIgnoreList      refile:/etc/opendkim/TrustedHosts
InternalHosts           refile:/etc/opendkim/TrustedHosts
KeyTable                refile:/etc/opendkim/KeyTable
SigningTable            refile:/etc/opendkim/SigningTable
SignatureAlgorithm      rsa-sha256
Socket                  inet:8891@localhost
PidFile                 /var/run/opendkim/opendkim.pid
UMask                   022
UserID                  opendkim:opendkim
TemporaryDirectory      /var/tmp
将接下来步骤的所有 test.com 替换成你自己的域名
mkdir /etc/opendkim/keys/test.com 新建域名目录
opendkim-genkey -D /etc/opendkim/keys/test.com/ -d test.com -s default 生成随机密钥
chown -R opendkim: /etc/opendkim/keys/test.com 将目录所有者改为opendkim
cp /etc/opendkim/keys/test.com/default.private /etc/opendkim/keys/test.com/default 复制一份,来作为私钥(不改直接用default.private也可以)
chown opendkim default 将复制的default文件的所有者改为opendkim(若不改发送邮件会显示没有权限)
把test.com添加到/etc/opendkim/KeyTable
default._domainkey.test.com test.com:default:/etc/opendkim/keys/test.com/default
修改/etc/opendkim/SigningTable并添加如下记录
*@test.com default._domainkey.test.com
添加信任主机到/etc/opendkim/TrustedHosts:
127.0.0.1
test.com
添加txt记录(基本就是default.txt中的内容)
配置完毕后,可以在http://dkimcore.org/tools/进行检测
配置成功,下面为postfix添加dkim认证:
修改postfix的main.cf文件,vim /etc/postfix/main.cf
smtpd_milters           = inet:127.0.0.1:8891
non_smtpd_milters       = $smtpd_milters
milter_default_action   = accept
milter_protocol         = 2
配置完毕后重启postfix服务,启动opendkim服务
service postfix reload 重启postfix
service opendkim start 启动opendkim服务
dkim配置完毕
通过之前使用的phpmailer继续像gmail邮箱发送邮件,并查看原始邮件
显示dkim:pass,配置完成
3.阿里云直接提交工单进行反向解析
至此全部配置完毕,邮件发送完成。
ps:在完成spf,dkim,反向解析之后,测试邮箱均能正常接收服务器发送的邮件,但是QQ邮箱依旧无法接收被拦截,查看log文件依旧提示550 ip受限,希望解决了这个的人能在下面留言给我点帮助。。
ps:在联系腾讯客服反馈问题后,问题得到解决,现在QQ邮箱能够正常接收邮件。
配置DMARC
在域名解析记录中添加
- 记录:_dmarc
- 类型:TXT
- 记录值:v=DMARC1; p=none; rua=mailto:dmarc-reports@domain.com
把domain.com换成你的域名
配置TLS
在上述配置文件中,已经包含了TLS的配置信息,就不再做过多陈述了。


太折腾了,这个邮件服务器。。比博客难搭多了。
是啊,折腾了好几天,查了八百个文章哈哈哈哈